
HF6 Jackpot Jones
After our time in sunny southern France, Patch and I returned to Hatten, where there’s snow on the ground, and not that many Flames. I took the defending Americans, and regretted it, as I didn’t see any great way to hold the Germans off for five and a half turns.
The Americans are trying to hold the area around “the fort” with nine squads and three M18s (and 9-1 AL Jones). The main setup area only extends three hexes west of the victory area, so there’s not a lot of room to work with. To the north, there’s five hexes, largely orchard and a couple of wooden buildings, as opposed to the stone buildings to the west. Two of the M18s can set up HIP in orchards, or can enter on turn 1. I set up two behind the main area of defense for late-game surprises, with the third (w/Jones) to enter. Two MTRs were set up to cover the north orchard. Two “?” were at the north limit in buildings, with a HS at the corner of the allowed area, and a squad in D20, who should escape into the orchard, and fire on any halftracks that try driving around my rear. G17 and K21 got Dummies, while the main west line had two squads and a BAZ. Two MMGs were sited in K20 and I21. Mistake: I forgot to set up boresighting.
The Germans have twelve squads, two Pz IVs, a Panther, and two 250 HTs. While they have good tools, they do need to take all but one location in the victory area. Or all but two, if they have more functioning AFVs. This keeps them a bit careful about HT rushes, as losing them would be a 3-3 tie; on the other hand, the tank destroyers can only take on the Panther from side or rear, and I know Patch isn’t about to let that happen. They all enter on turn 1, with an extensive entry area.
Patch entered in two large groups, one to the west, and one aimed at the NW corner. To my surprise, he stopped to search in B20 (later, I was thinking that D21, just outside his search area, would have been a good backup to the squad in D20). I had no fire, but Patch poured everything he had into D17 with no result.
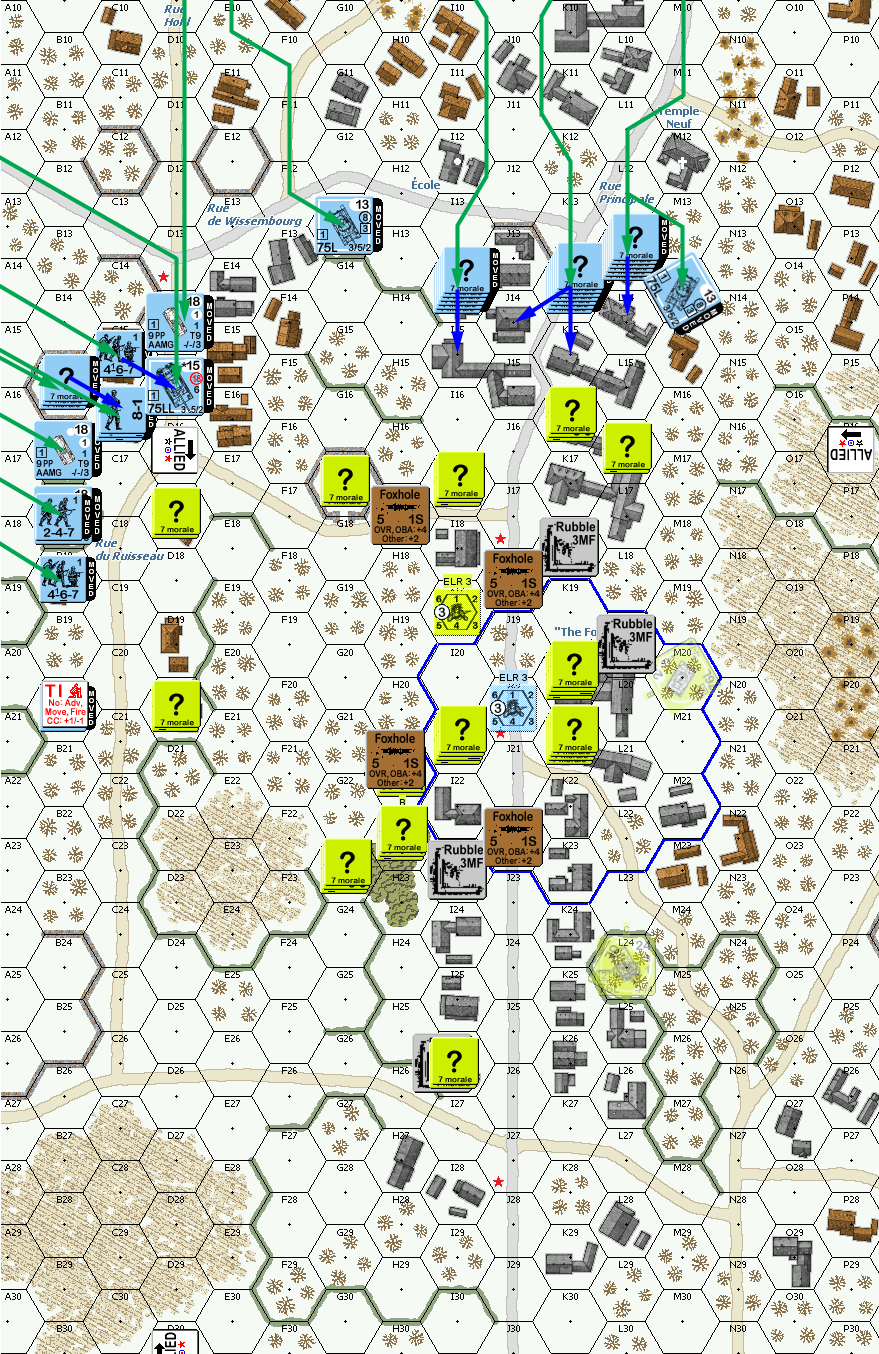
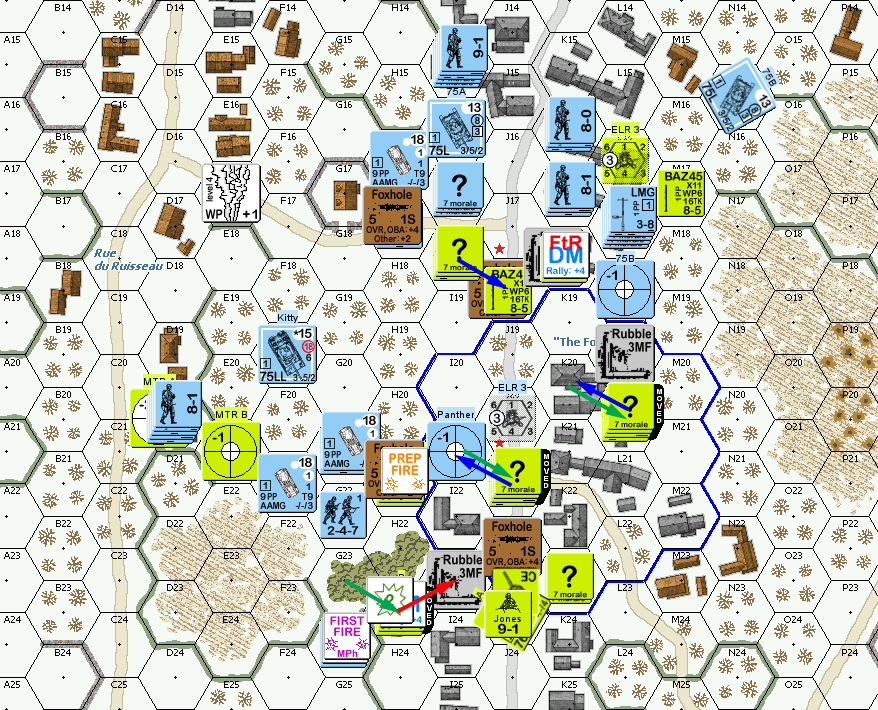
Situation, German Turn 1, showing the full board. North is to the left.
My movement phase was a lesson in just how congested this area really is. I managed to move around some Dummies because Patch couldn’t get LOS. A BAZ squad headed for the J18 foxholes, and he found that J20 was blocked, and then after reveal in J19 he found a shot from I15 blocked. Sadly, he pinned me with the shot from C16. Another shot at D17 failed to do anything.
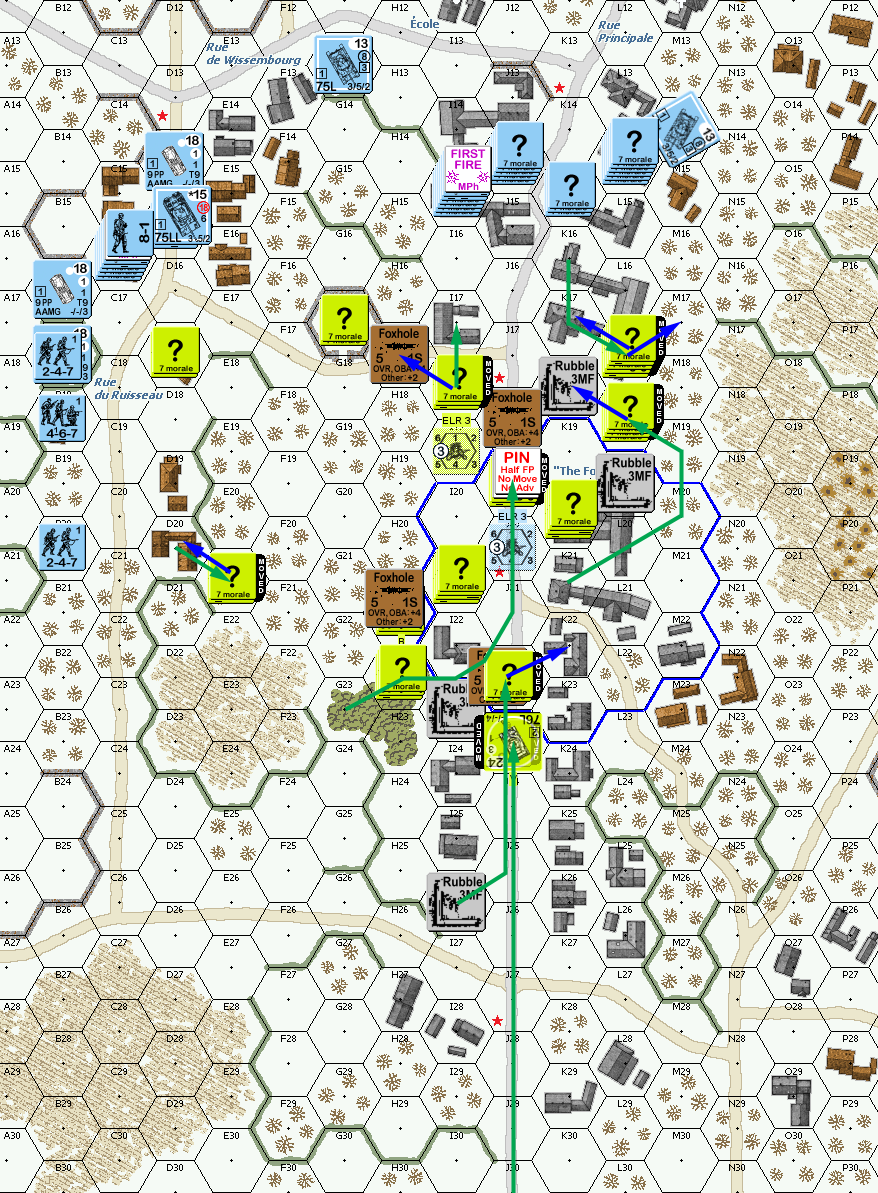
Situation, American Turn 1.
Patch’s finally got a result on D17 for his turn 2 PFPh and broke the HS. His first move bump-revealed the squad in D20 (he was expecting a Dummy). While Patch remained fairly cautious the entire defense in D20 failed as they cowered on the first shot, and then broke on FPF (12 and 11 respectively…). The most I managed to do was pin a moved squad with my sniper. Patch managed to reveal the BAZ squad in M17, but failed to get a break despite an unlikely hit from the Pz IV they were hunting. K17, looking at a tall stack of Germans (some concealed) self-broke to get out of the way, but sadly, could only back up one hex.
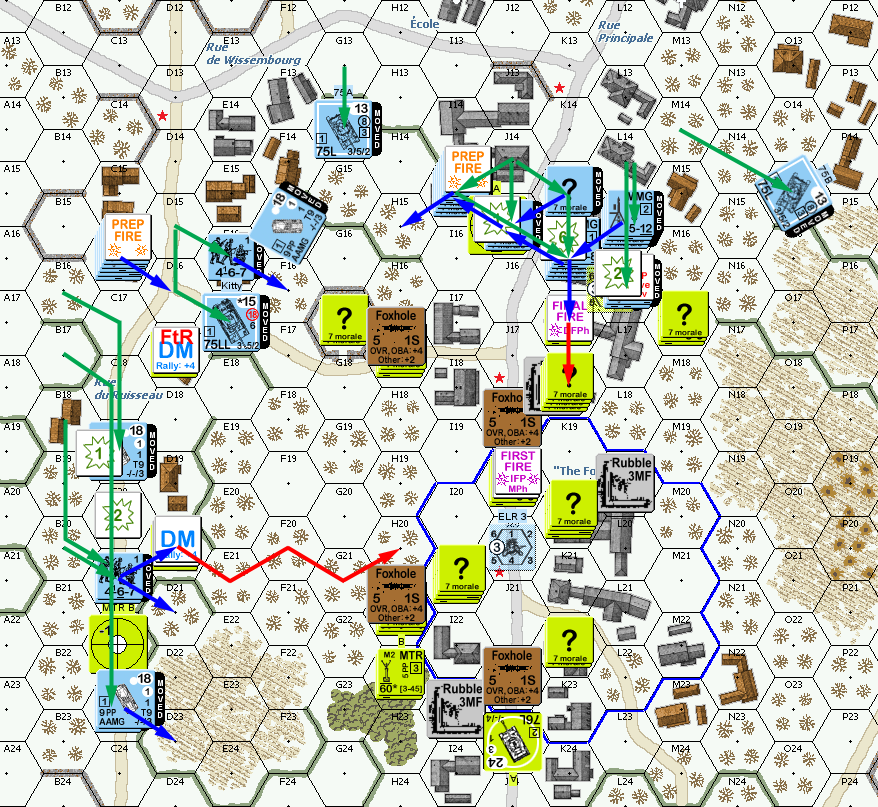
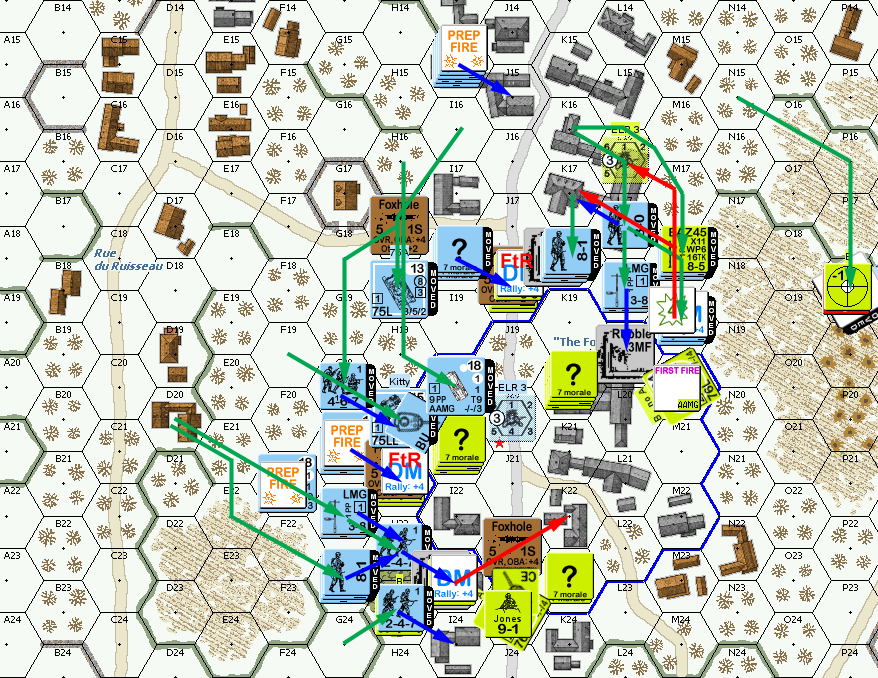
Situation, German Turn 2. Mistake: I somehow miscounted the D20 route—they should have made it to I21.
The first action of my turn 2 was placing WP on the Panther (mistake: I rolled a 8, which is no WP—and miss—and I somehow read that as a 7 for ‘last round’) from a MTR. I revealed Jones to get a hit on the concealed leader in J15, breaking him, but only pinning the squad. The squad in M17 hit the Pz IV with a BAZ (8 +2), but only managed a possible shock, with Patch failing the TC (it was a hull hit, so one lower would have immobilized it, which would have been good enough). The big mistake was getting impatient to get J19 into cover, so I tried moving into the J18 foxhole instead of advancing, and rolled a 12 on a K/3 to lose the entire squad, leaving the second BAZ sitting out in the open.
Things went from bad to worse in DFPh, when he got a 1KIA to kill the other BAZ squad, and eliminated the Dummy in G17. The former did set off my sniper (for the third time, but the first two were pins) to break the L16 squad that did it. A 2MC on my broken squad in H12 was another 12 eliminating him.
Situation, American Turn 2.
Just because things weren’t bad enough, while Patch didn’t rally anyone for his turn 3, the Pz IV immediately recovered. I had figured breaking was well worth killing the tank, but now the squad was gone, and I hadn’t even slowed it down. Patch of course moved up some more, notably putting a lot of pressure on the north side where he largely got inside the range of the MTRs. While I had no effect on him, it wasn’t for a lack of dice. The MTRs got some good hits, including a ‘2’ effects as he moved a stack into D20, but he passed all the resulting MCs easily. Thankfully, he couldn’t do anything more than a pin back. Patch moved two groups into my large stack in L17, only to find it was all Dummies.

Situation, German Turn 3.
I couldn’t self-rally the one broken unit I had, but Patch got both of his back for my turn 3. It was now well past time to get my MTR section out. I tried pulling the one in the woods out, but broke to a 1MC. Jones was doing a good job of keeping Germans off the main road, but it was time to contemplate an exit, so he rotated so that if the Panther showed up he could try for Motion and then immediately move in bypass of K23 and out of LOS. Defensive fire pinned the HS in H21 and reduced the brokie in K18.
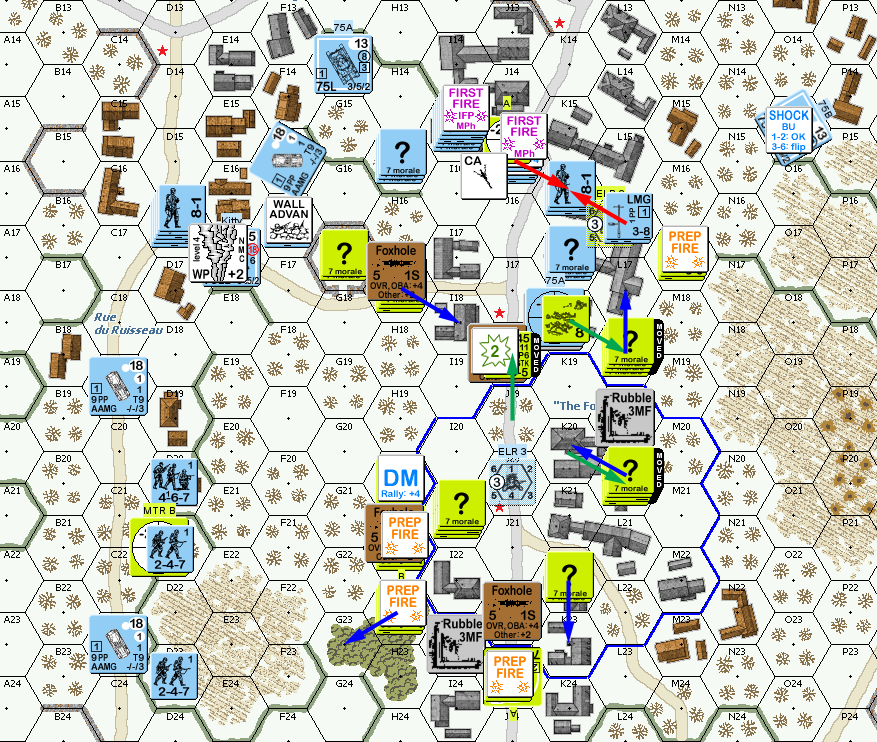
Situation, American Turn 3.
Patch’s turn 4 Prep broke the MTR HS immediately, and another 12 ELR and wounded the 8-0 as well as ELRing the squad in J18. That left him free for a general advance, with 3x”?” showing (one of which was a Dummy, though the other two were the MMGs with leaders). The second TD finally revealed itself, breaking a 548 that came adjacent with the AAMG. I partially expected Patch to VBM-freeze I21 so he could get at it, but he refused. On the other hand, the south Pz IV found itself with no good options, and tried a charge along the edge of board, forcing a Case J1 shot before leaving TCA. I rolled high for a miss… or a lack of APCR, and then the regular AP do-over was a CH to burn it. Given how often I get the drop on one of his tanks, this was satisfying in a bad turn.
This also left me with ROF to deal with a squad that came up behind the first and recovered my BAZ. The MA just barely got a hit at range 2 to break them also.
Situation, German Turn 4.
Patch rallied his 548 in my RPh, and Jones now had a big problem. No tanks had wandered into his LOS, so he hadn’t kicked into Motion, and now there were two adjacent HS with a 1/2 chance each at PFs. So, he tried the AAMG and MA at them, missing with both and an IF shot. The other TD did the same with L19, and got a hit with the MA for a K/3. I21 tried Dashing to the other side of the main road but got caught with a NMC to break everyone.
His first HS pulled out a PF and hit (dying in the process) … for a dud! I’m pretty sure that’s the first dud I’ve seen in my ASL career. The second one also had a PF, but missed.
Patch self-rallied a squad for his turn 5, and got a third PF in his prep fire to burn Jones’ TD. The Panther advanced into the street, and being adjacent to the only GO infantry I had left, I tried for Street Fighting, but failed the PAATC, for the 9-1 to go alone and fail. From there, he swarmed into the town. I fired on squads as they moved into the main road, getting a KIA on one, and K/2 on the other. But there were no problems getting into the buildings, where I couldn’t do anything. My last act was to reveal the L24 TD and kill a 250 that cruised into the back causing DM in my brokies. AFPh then broke the squad in K21 and pinned the 9-1, leaving me only him and a pair of tank destroyers for the final turn of the game.
Afterword
The biggest setup problem is that the Germans enter off-board from 9/10 hexrow, and the American setup area is seven hexes back from that. Notably, a lot of stone buildings must be left open.
My biggest setup problem is I didn’t put enough defenders over there, so when the primary infantry thrust came down that road, I found myself desperately out of position. A third squad or so in there would have helped. As is, it wasn’t a bad defense, and I certainly kept Patch playing cautious longer than I expected. But losing three squads in two phases on turn 2 was just too much and led to the fact that I had way too little to hold him off later. Worse was losing both BAZ, with them being unrecoverable (by me). Overall, it was much like my experience in “Latecomers”; I delayed Patch quite a bit, but lost so much that I just collapsed later. Three different ’12’ MCs did not help one bit. (Patch had some close calls with 11s on some fire, but the dud was his only 12 all game.)
I seriously contemplated swarming the Panther for a real attempt to kill it on turn 3, but I knew I’d probably lose at least one TD in the attempt or its immediate aftermath, and figured I had even odds at best of actually getting a flank/rear hit out of it. And there certainly wouldn’t be any infantry support for me. Patch won’t give me a better chance at his armor, and my kill of the southern Pz IV shows how stuck he was. (If the BAZ earlier had immobilized/killed it, going after the Panther would have been easier to contemplate.) As it was, I did need a better plan for my armor in general. Two on and one enter was fine, and M20 is actually not a bad position. I never had a good idea for the third, and L24 wasn’t the place for it.
If you want to really surprise the Germans, J19 might not be a bad place. It’s a little likely to see someone come down the main road, or the D16-G18 road (with front armor facing it), but if you can suck the Germans into fighting through the E20-H20 orchard, flank shots are possible.
All of the Hatten scenarios seem to really give the Germans the tools they need in a challenging environment. Patch can frustrate that, but I haven’t been able to do it.
Discussion ¬