
V2 Birthday Present
Mark has gotten himself a fair chunk of the Wing Leader titles over the last couple of GMT sales, and we recently got to trying it out.
Certainly, there are interesting ideas going on with the system. First off, is the idea that since relative altitude was the determining factor in much WWII air combat, the up/down dimension of the board is literally height/altitude, putting the game into a “side view” instead of the normal top-down perspective. Instead of trying to get ‘depth’ at all, the board represents progress towards a goal, such as a bombing target. Past this, the system is fairly simple, though there are cards with different stats for different types of aircraft.
Mark and I tried the second scenario from the Victories (early war) set (the first one is purely solo). The first scenario is a group of Japanese bombers being intercepted by American Volunteer Group (i.e., Flying Tigers) fighters—this scenario is the same thing, but the Japanese have fighters escorting the bombers this time. There’s also more Americans, two and a half squadrons, instead of just two flights (half-squadrons).
I had the Japanese, who have a fairly constrained setup. The two squadrons of bombers have fixed setup, and the squadron and a half of fighters set up ‘as if’ escorting them (escorting is a particular mission profile in the game, and the Japanese act as if this was true for the setup, but they’re actually on ‘sweep’ orders). Given some choice, the fighters set up stacked above the bombers. A squadron and a half of P-40Bs approach from ahead and below, while a flight of P-40Es can set up there, or in pursuit of the bombers at altitude, which Mark went for.
The P-40s have radio networks to and ground control to vector them towards the Japanese, which is the other bit of setup. Mark set them about two-three turns travel ahead of the bombers, and we were off. The P-40Es (veterans) had no trouble spotting the formations ahead of them, while my fighters did not see them below and behind. An interesting idea is that the turn sequence generall moves from least maneuverable (bombers) to most (unalert craft—mine, then alert), but anyone who has tallied (spotted, though you can only have one formation tallied at a time) moves directly after their target. It really makes movement easy to do.
Combat only happens within the same square, and formations all only go two or three squares a turn (not a high resolution of relative speeds here), so it took three turns for the P-40Es to overhaul the bombers. On turn 2, my veterans (a squadron of Ki-43s) spotted the P-4oEs and dove down on them for our first combat (since the Japanese have no radios, they couldn’t alert the remaining flight about it).
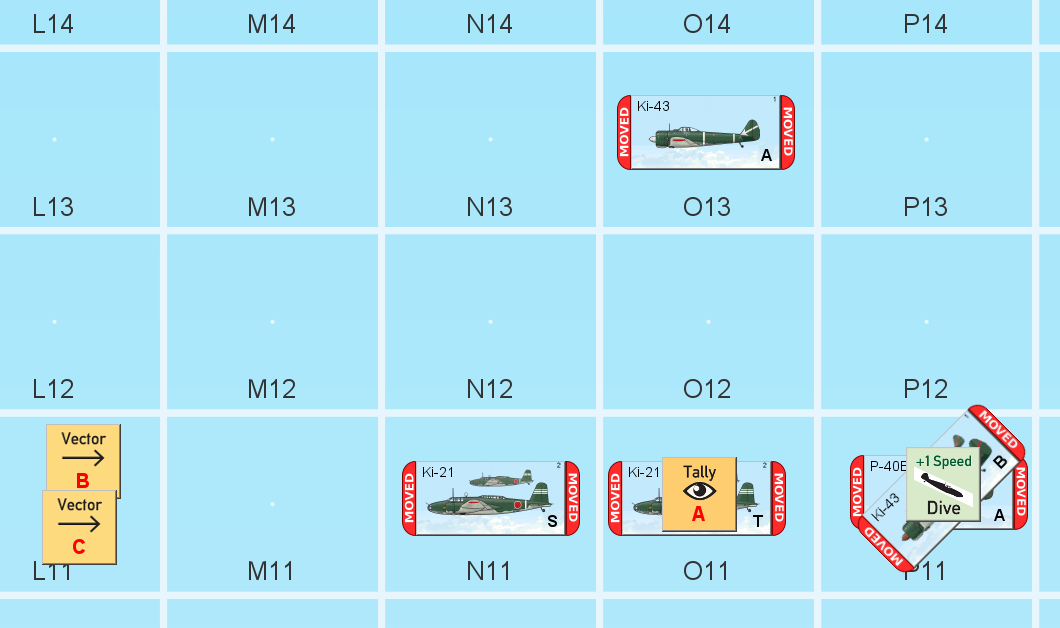
The combat procedure itself is where the game indulges itself with some complications, since you compare ratings for what column to use, and there’s a lot of modifiers, some of which apply to the ratings themselves and some are to the 2d6 roll. Combat can either be against the speed or turn ratings of the aircraft (attacker’s choice), and diving grants a speed bonus (of course), but even so, the Ki-43 did better in a turning fight (+1…), and a better roll from Mark meant we both did one hit. Hits then have to be ‘confirmed’, which is done by comparing a die roll to the target’s defense (presumably rating armor and sturdiness). Both hits were confirmed (it seems that one loss equals one aircraft, and the size of the squadrons is determined by the scenario, eight aircraft here), and then you check cohesion, to see if the involved units got too scattered to continue in the fight. In this case, mine did and headed home.
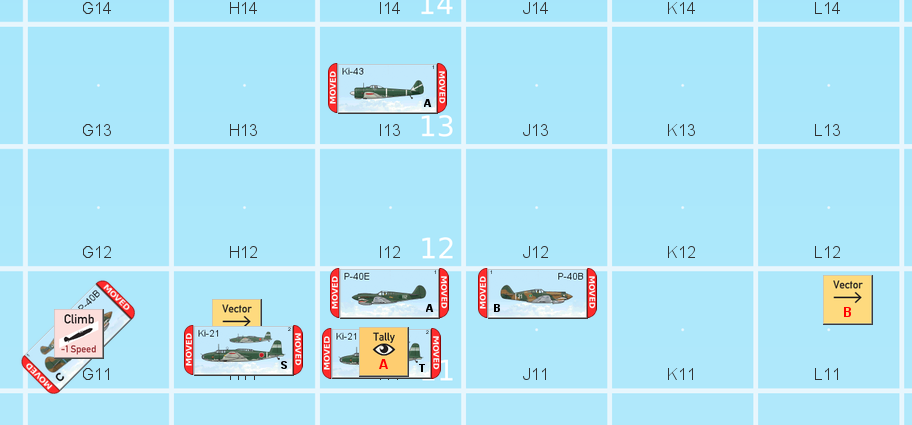
The next turn, the P-40Es caught up to the bombers unmolested, and took them on. Thankfully, they did nothing to the bomber formation (despite being on the +3 column), while taking a hit to create a straggler (which is a half-hit, and seems to represent one of the planes being noticeably damaged). The rest of the P-40s were just climbing up to altitude, and Mark tried to change the vector points to be ahead of the bombers again, but only succeeded with one.
The P-4oEs stayed on the bombers for turn 4 and caused one straggler with two hits while losing a plane, but kept cohesion while the bombers were disrupted. The green flight of P-40Bs failed to shift vectors again, and both failed to spot the oncoming Japanese bombers, leading to the green pilots flying right by them on turn 5. The melee with the bombers continued, with both sides losing a plane (I was continuing to roll very well in combat through this), and the bomber formation broke up entirely (which doesn’t mean they have to go home…). At that point (turn 6), the P-40Es turned their attention (and tally) to the forward group of bombers, along with the main squadron of P-40Bs, while the Ki-43 flight finally spotted the oncoming Americans, but the green flight of P-40s still failed to spot anything, and continued to their vector, and effectively out of the game, because after this it was going to take too long to catch up to the bombers again.
This lead to a two-on-two combat. You pick a lead plane to base the comparisons off of, and then other units are just a +1 to the effective stats. This actually worked out the same either way for me, and it has no effect on how you take hits (I’d think you should be forced to take the first hit on the primary unit). Mark rolled horribly for no hits, while I caused a straggler in the P-40Bs. Both of my units were disrupted, while the P-40Es finally succumbed to attrition and broke. The next turn, it was a two-on-one combat, but still with me disadvantaged, but no hits took, and my remaining Ki-43s broke, while Mark’s squadron was disrupted. That left the remaining fighters against the remaining bombers the next turn, and Mark scored three hits which turned into two kills (one kill and two straggler results).
Afterword
The bombers would have started flying off the edge of the board next turn, effectively ending the scenario, but the P-40s broke at this point, returning to base. The losses on my side added up to 7 VP, while I got 3 VP for his losses, 1 VP for the broken bombers getting through, and 3 VP for the disrupted squadron. Tied VPs, and the Japanese need at least five more for a draw.
Presumably, my good pilots turning around and going home after one kill is to blame for a lot of that. I should have been tying him up in air combat while he was picking on the bombers. The second unit getting involved earlier might have been nice, though jumping in once the second wave arrived was handy. On the other hand, Mark didn’t even get to use a flight, as it couldn’t sort out ground control, or spot anything.
In general, the game lives up to its promise of giving the feel of squadron-level air combat. With just a bit of work, you can see what’s supposed to be going on. On the other hand, with speed and turn ratings seemingly maxing out at seven, it feels a bit more coarse than I’d expect, with the individual characteristics not meaning as much as I’d expect.
The real problem is the decision space feels small. Outside of deciding which unit a squadron will try to tally, most of the game is you going through the procedures with few choices. Now, this is a simple learning scenario, so maybe things open up a bit in more complex ones, but it does feel like a system built around seeing lots of complicated interactions hanging on a few decisions, instead of presenting you with lots of interesting decisions.
Discussion ¬