
HF5 Graveyard Shift
After failing to rescue a corps HQ section, Patch and I returned to Hatten, where I took the attacking Americans in the fifth scenario. I’m not sure how sides were chosen at this point, but I think it was just a switch in nationalities from HF4. In this one, the Americans are attacking along the south edge of the map towards the graveyard near the end of January 10.
Not only is it the usual interesting situation, but the victory conditions are different: The Americans need to control the majority of the graveyard at the end of five turns, and they need to secure the perimeter by making sure there are no Good Order Germans in two buildings (AA13 & X9). Patch was thinking the Americans needed Control of those locations, and set up his Germans with more emphasis on those buildings than might have been wise.
The Germans have a fairly broad area to defend with ten squads (mostly 2nd Line), the usual toys, and one 75L ATG. The Americans have a fairly restricted setup area, but have twelve squads, 2xMTR and four Shermans (half 75W and half 76W). Also the Americans get an automatic Smoke OBA mission. They choose a hex before setup, and then resolve Accuracy (50% here), and only shift it one hex if inaccurate at the start of any one PFPh. My general plan was to secure AA13 immediately, while the main drive got going to the graveyard on the other side of the railroad embankment. X9, I figured I’d put pressure on as I secured the graveyard, and hoped I could just make the location so unlivable that I could break anyone there.
Patch mostly set up north of the embankment, but had foxholes on it, and garrisons in and in front of the graveyard. Pre-game rubble took out three buildings, including AA13. I had thought the Smoke must happen at the start of the game, but that meshed with my plan, so the AR was in AA14, and drifted to BB14, generating Smoke to cover my advance on AA13. One MTR opened up on FF10, and hit to reveal the “?” there as a Dummy. My first move caused Patch to reveal a HS in Z15; my HS survived, but a followup squad broke, but Patch declined FPF at an armored assault into the smoke. The rest of my move generally clustered around that area, but I armored assaulted a stack all the way through the smoke to BB13.
Advancing fire pinned Z14, and I sent a squad plus 8-0 in there. I also advanced two squads into AA13 (leaving a MMG squad and 9-1 under the Sherman). Not only were the odds horrible for Patch in the former, but he rolled a 12, while I knocked them out. AA13 turned out to be a 3x”?” stack of dummies, giving me easy control of the first objective.
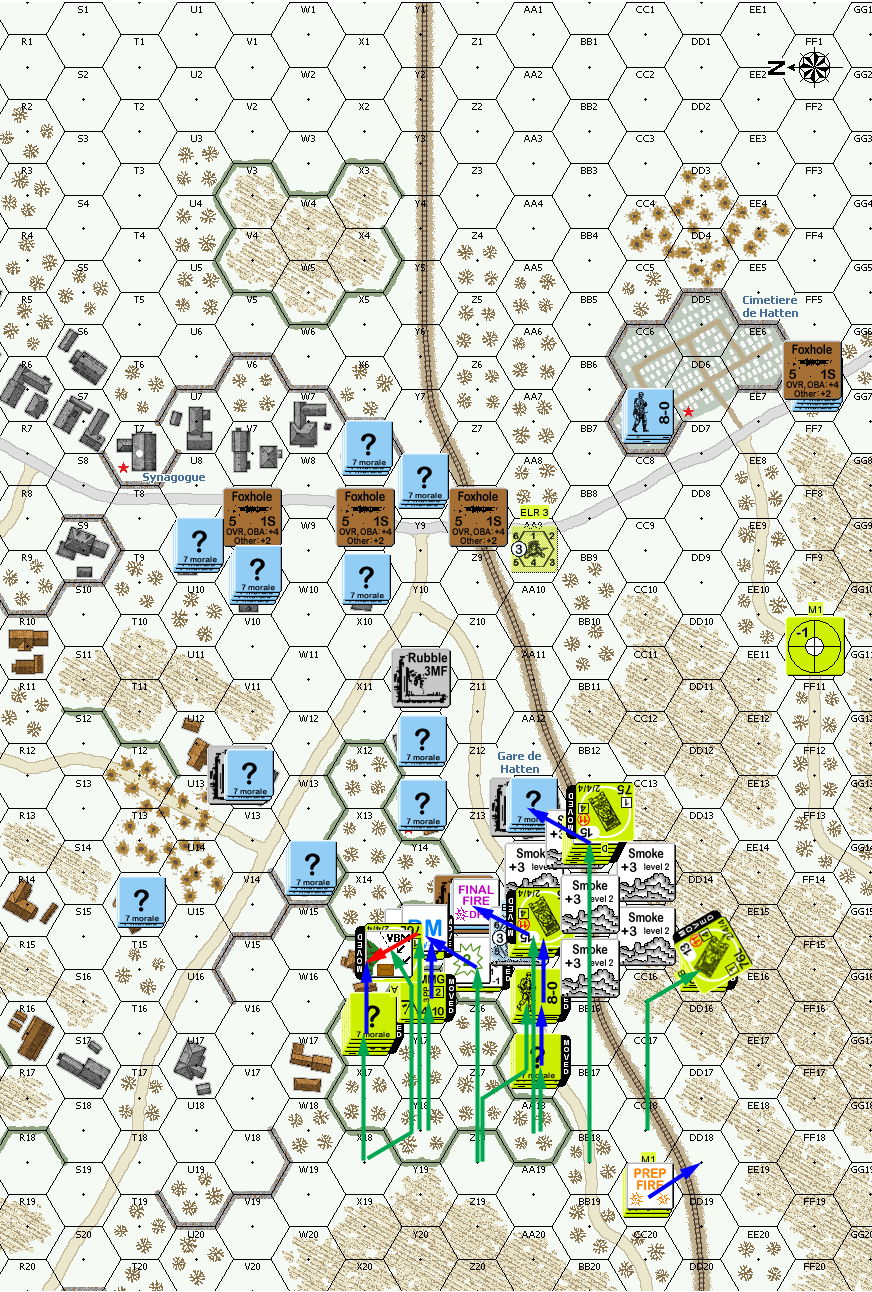
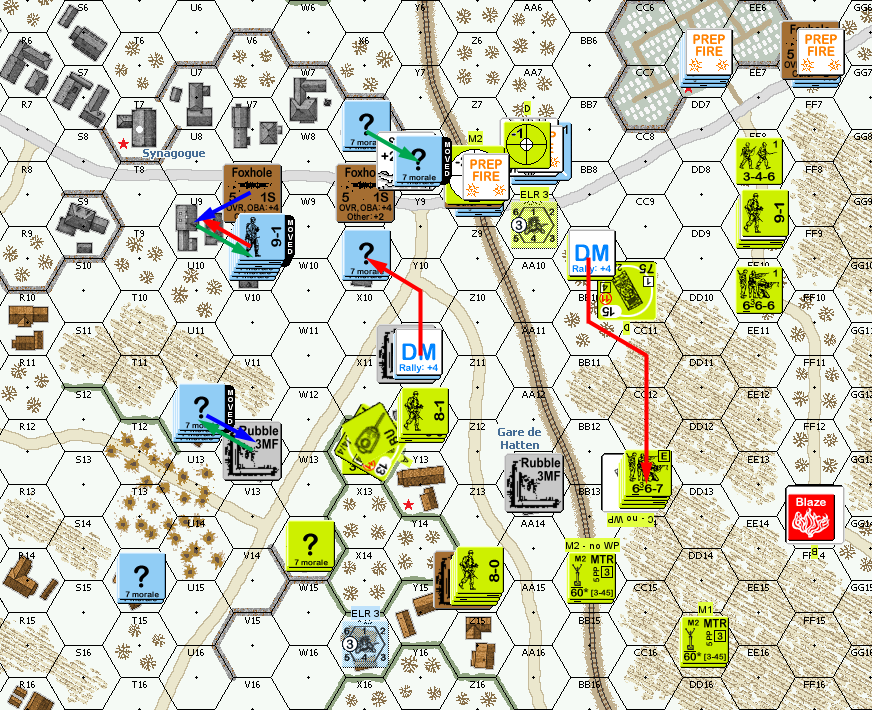
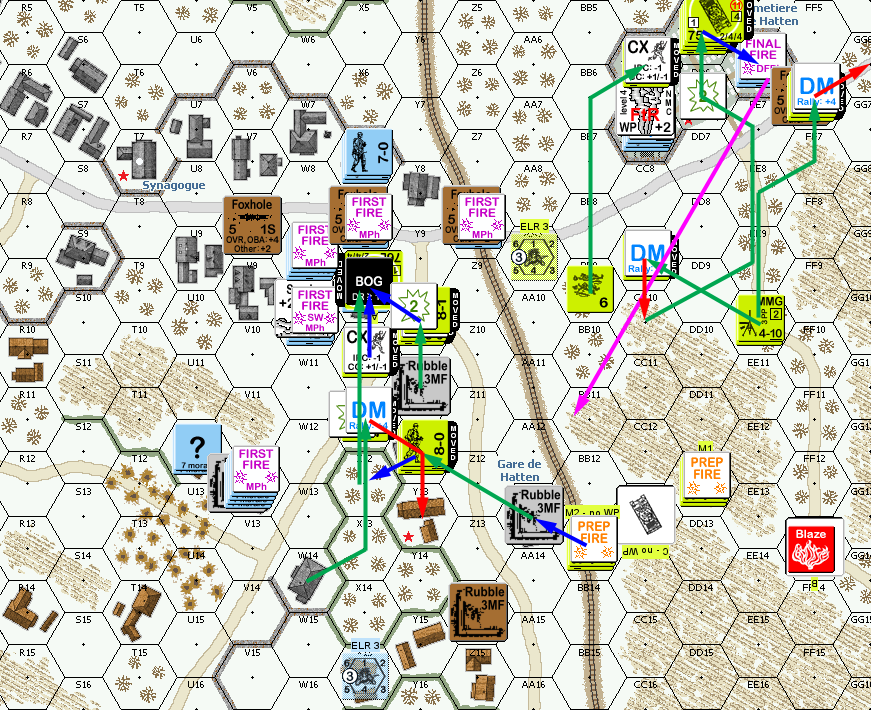
Situation, American Turn 1, showing the full board. North is to the left.
Patch stayed quiet for his first turn, not giving me many good shots. However, a ranging shot from a MTR set off his sniper, who turned my broken squad into a HS (RS picking him over the “?” stack, which included my 8-1).
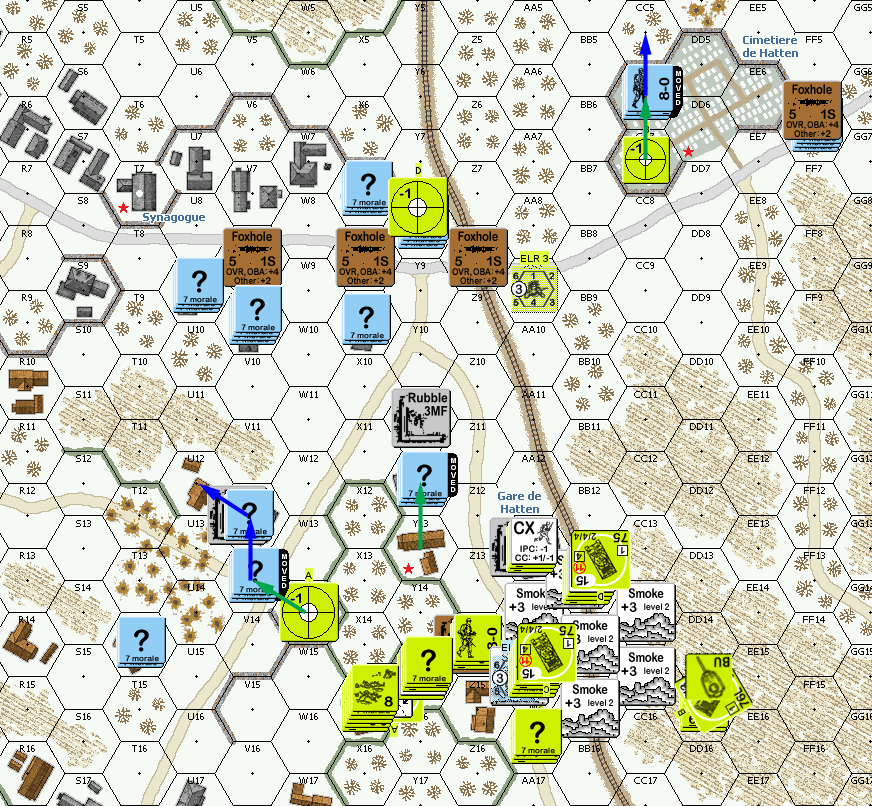
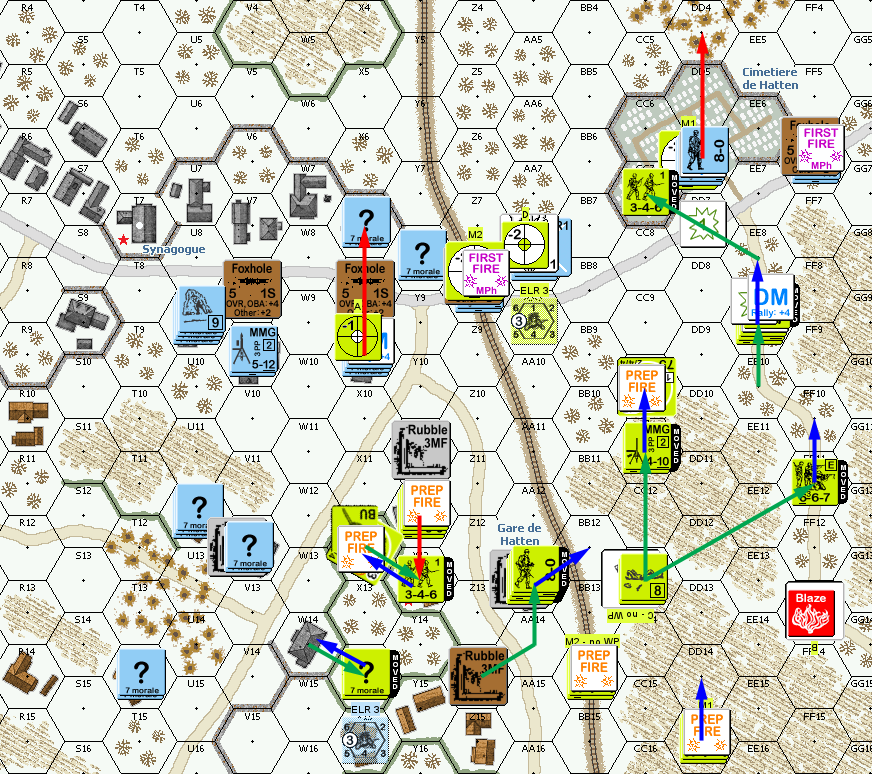
Situation, German Turn 1.
I rallied my surviving HS for my turn 2 RPh, while Prep saw a Sherman put Smoke on Y8. Patch revealed a squad in Y12 after I moved a stack adjacent, but only pinned my 8-1. In DFPh, Patch revealed the ATG in AA8 as it fired on the Sherman getting ready to cruise up the road to the graveyard. Despite a lot of fire, there were no actual results, and I sent a squad into Y12 which I promptly lost to a German ambush.
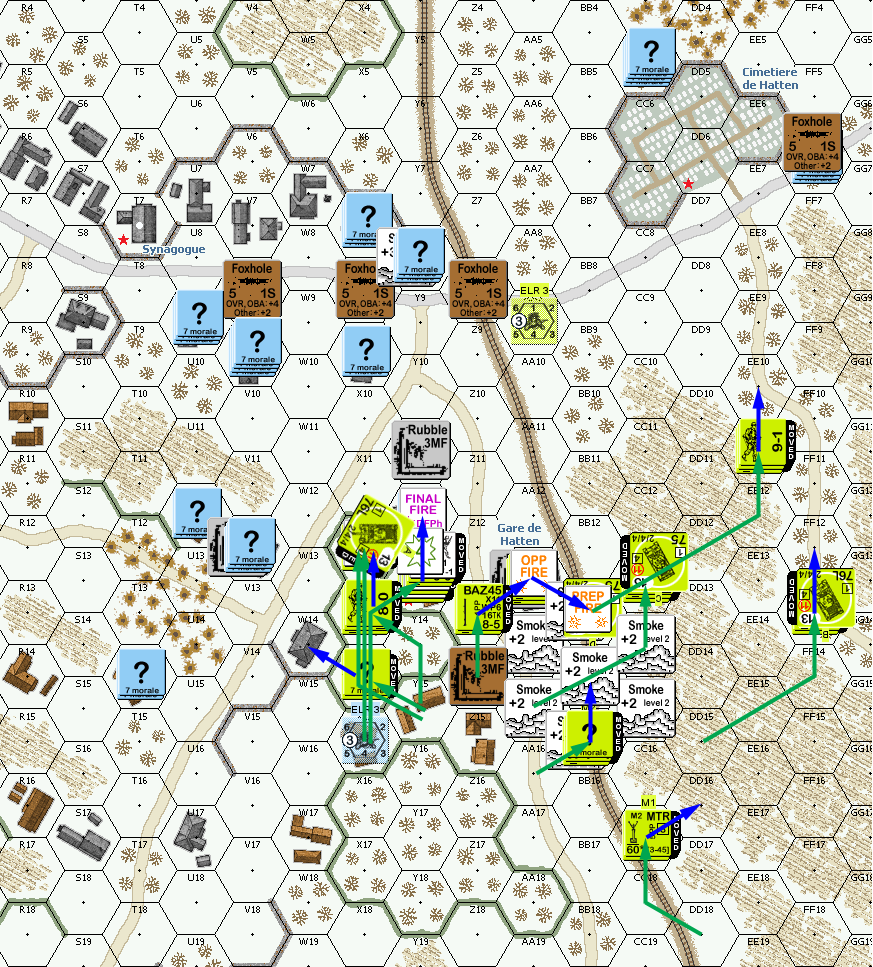
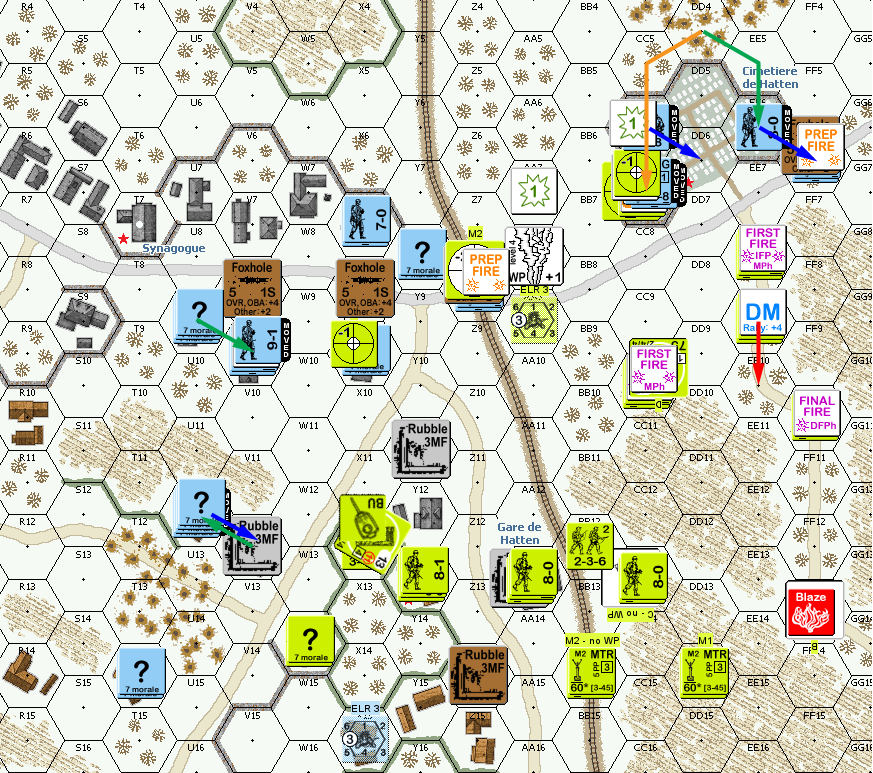
Situation, American Turn 2.
Patch opened up his turn by grabbing the BAZ my squad left behind and firing it at the Sherman I parked in X12. Even taking the backblast, he missed (and lost the BAZ), and then missed with a PF for his second SW usage. On the other hand, the ATG burned the Sherman in FF13, and malfunctioned on an IF shot. MMG fire from V9 broke my MMG squad and ELRed a HS. His only move was to bring a stack back within the graveyard. Advance was a little more active, as he occupied the foxholes on top of the embankment, and DD6. Thankfully, he failed PAATC against the Sherman after the supporting infantry had to rout out.
I didn’t get anything for my rally, but Patch repaired the ATG and rallied his MMG squad, who thankfully had just routed away from good shots. I managed to put WP on the ATG, which merely pinned the crew. After pouring a lot of fire into Y12, the squad finally broke. Most of my movement was aimed at getting at the ATG and graveyard, but my MMG squad and 8-0 broke to fire from the graveyard. However, the LMG in the foxholes in front of the graveyard malfunctioned.
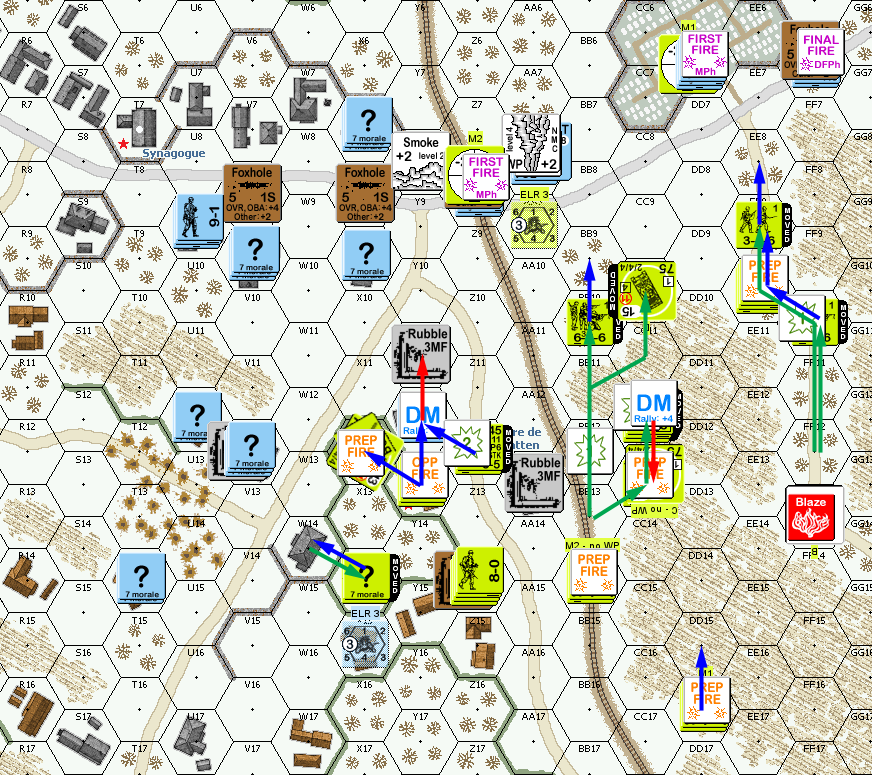
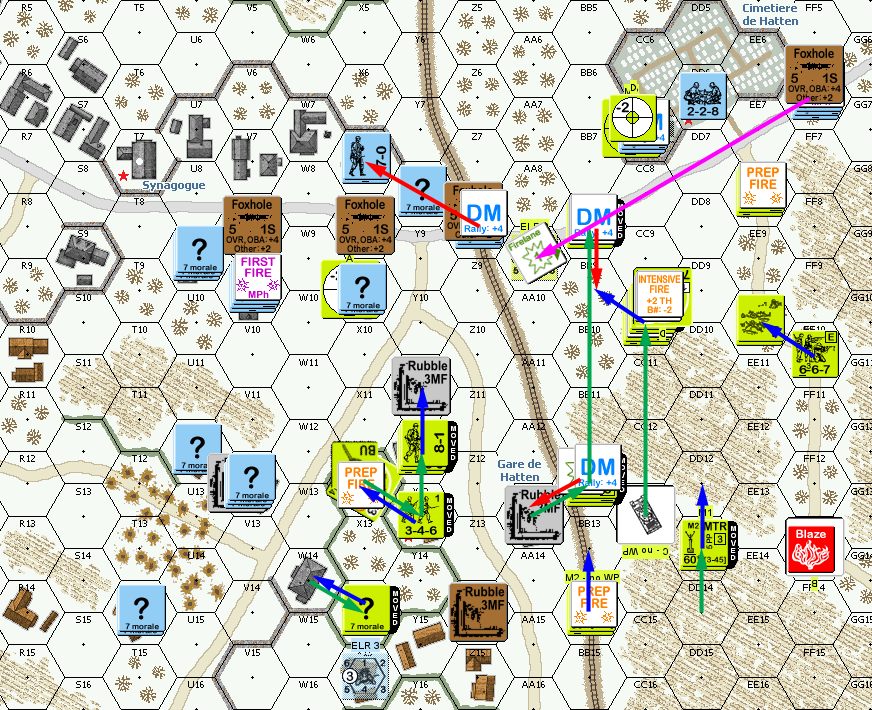
Situation, American Turn 3.
Patch didn’t get anything for his turn 3 RPh, but I rallied the squad and HS in Z14. His ATG took on the Sherman in CC13, bouncing a round off the turret, but then put another round into it. IF at CC10 malfunctioned the gun again. The rest of the south half of the board opened up to break the squad in BB9 and pinned the one in EE9. He moved into better positions, and most of my fire was horrible (lots of 10-11 rolls), but one good roll broke his 9-1 for a second time, and pinned the MMG squad.
Situation, German Turn 3.
The fourth turn brings dusk, and a +1 LV to all shots. My leader failed to rally, but the MMG squad did, while Patch failed to get anything. Prep fire broke his squad in the graveyard, leaving only the squad in front of it as protection. I moved more troops towards there, and successfully Dashed a HS into the graveyard itself, but Patch broke a squad as the moved up the road, and then in DFPh, broke the squad in Y12.
Situation, American Turn 4.
Patch had a very good RPh, with a couple of problems. The 9-1 rallied, along with the squad in X7, and he repaired his LMG. The squad I’d just chased out of the graveyard went berserk, and he lost the ATG for good. I managed to rally the 8-0 and squad in CC13. The berserk charge got in close with my HS, and not only did I not do anything better than a PTC, but it left me with very little left to fire on the south side of the board. This let him get the ex-Gun crew into the graveyard to help protect it. Naturally, he took out my HS in HtH CC, and a situation that had looked very promising was now a disaster.
Situation, German Turn 4.
Nothing happened for my turn 5 RPh, but a MTR got a CH on it’s third shot for a K/3 vs the squad on top of the embankment in Z8, ELRing the remaining HS. CC7 took a few shots, but my MMG got another ‘2’ for a 1MC that broke them again. I tried to shift the squad in AA13 over the embankment, but they broke as soon as they moved out. Similarly, an attempt to get at the graveyard broke.
Situation, American Turn 5.
I rallied a squad in Patch’s turn 5 RPh, but he broke the one in EE8 with his first roll. However, the MMG in V9 malfunctioned. Since I was looking at needing to get into X9 in my last turn to tie up everyone in melee (at least), that was a big help. (I had thought he might instead move V11 to try and reinforce that building.) Instead, Patch moved the HS in T14 through the shellholes so that he would advance into the V12 rubble, and moved U9 up. This left no one adjacent to X9, and able to go in this turn. I spent a fair amount of effort on X9, since one of my hopes was just to break whatever was in there, but I couldn’t strip “?”. He then advanced into three hexes adjacent to X9, giving quite a lot of fire to get through if I wanted to tie the building up in melee. The FF7 foxhole squad advanced into the graveyard to hold it from behind the wall.
I rallied a squad in AA13 for my last turn. One of the MTRs put its last round of WP on CC8, breaking the crew there. I sent the W14 HS around to charge X9, but he was stopped by fire from V12. Then the X12 Sherman put sM on W10, and escorted a HS to X9. Patch fired a PSK out of the smoke and missed. There was a squad in X9, forcing the HS out, but the Sherman entered and bogged (which was good, as he used the last MP to enter, and I needed him Stopped to potentially force melee). W9 pulled out two PFs, which missed thanks to TEM and movement. An attempt to get adjacent from Y11 got pinned.
On the south side, my first attempt to get at the graveyard broke as Patch put down a FL. A squad led by the 9-1 broke as I came up on the south corner (Patch pointed out he could shoot before I got into the foxholes; I pointed out he had TEM, so I’d get WA). A squad on the north side managed to get into CC6 without trouble. The remaining Sherman helped a squad get through the FL and into the front gate of the graveyard (the ‘stay on the path’ requirement for vehicles was a definite complication here). Patch fired on DD6, but rolled a 12 to lose the LMG completely.
Neither of us had any more effective fire. I got the CX HS and 8-1 into X9, and Patch got Ambush (I had a +3, and rolled a 6…), but there were two targets (tank and infantry) and only one squad present, so he killed the infantry, leaving him in melee with the immobile tank. I also went into EE6, tying us both up in melee. I had Control of three of the graveyard hexes (should have advanced my HS into CC7 for a fourth), Control of AA13, and Patch was not GO in X9 for an American win.
Situation, American Turn 6.
Afterword
Now a big mistake that raised its head at the end of the game is that when I set up the scenario file, I forgot to mark turn 6 as a half turn on the turn track. My planning had been around this being a 5 1/2 turn game, as the scenario card says. But we weren’t looking at that at the end of the game, and I was suddenly thinking I had to make it through a German counterattack on X9 and the graveyard, which warped both of our thinking. I think Patch would have assault moved and advanced the intact X7 squad into X9 at the very least. Having two squads there at the end would have allowed attacks against everyone, and might have resolved the CC in X9.
Instead, we played into the next half turn (tying up EE6 in melee was important here). Patch’s first PFPh action was a successful PF attempt that hit and burned the Sherman in X9, which would give him the win if it was a 6-turn scenario. I had hoped to have more in there, and that the +3 TEM +1 LV would keep the Sherman safe, with PAATCs limiting who could get into the hex.
At any rate, it was another tense scenario on both ends. SAN is 3 for both sides, and they each should have gone off multiple times, but instead there was one activation for the entire game.
My initial plan had been to take the graveyard faster than I did, and then turn forces aside for more pressure on X9 at the end. As it was, I thought it was happening when I initially got my HS in there. Patch’s berserk roll did very well for him, and turned that situation around. Along with the crew getting in there, I was thinking I had big trouble, but I managed to break both units, and the remaining squad just couldn’t manage by himself.
My initial plan was too sanguine about X9, though there is a lot to be said about only needing no GO in a location, and having 75mm acquisition sitting on it too keep much from going in there. I had also expected to get into Y11 a lot earlier than I did, as I kept breaking in Y12. My initial thoughts figured I’d make the hex a lot unhealthier than I ever managed.
Discussion (2) ¬