
17 Lost Opportunities
After finishing up in Tulle, Mark and I went back to Paratrooper, and scenario 17, “Lost Opportunities”. It’s D-Day, and the Germans are trying to retake Ste.-Mère-Église from 505th Parachute Regiment. They have six turns to take five buildings on board 1.
I had the defending Americans, who get eight paratrooper squads, a 60mm MTR, a couple MMGs, five BAZ, and an AT gun. The defense is along the narrow edge of the board, where it abuts board 2. The ATG went in J4, where there’s actually pretty good LOS up the entire center street, and if the Germans went too far on either flank, it’d still have a shot. My one HIP squad took a MMG and was in D2, where it could do a surprise shot if he advanced on that flank. The MTR was in E6 with a foxhole, as it’s one of the few hexes with open ground in front of the buildings, and has a few places it can see in the MTR’s range. The other MMG was up in 1F6h2, where it could largely out-range the Germans.
The Germans have a mix of nineteen second line and conscript squads with the usual machine guns, a couple 50mm MTRs, a Marder I, and a couple of captured French Renault tanks. Most of them in a line at the limit of the setup area, but the two MTRs set up on the hill, with the Marder right in front. As a last note, the Germans lose if they ever go below nine unbroken squad equivalents. Given the quality of troops, its a heck of a restriction.
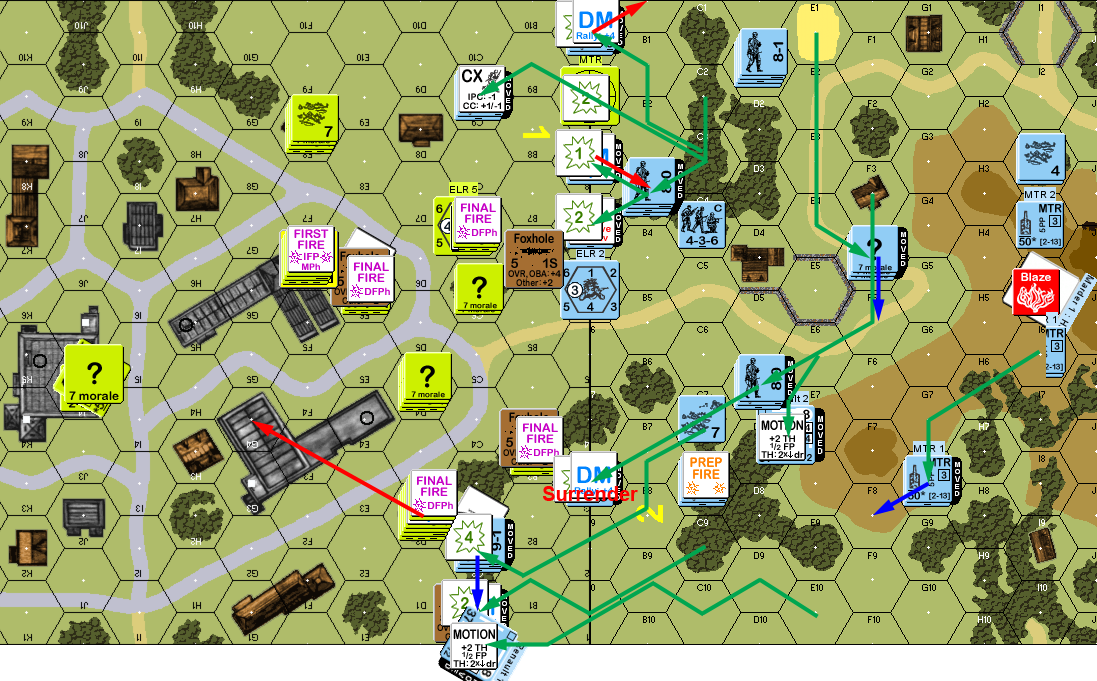
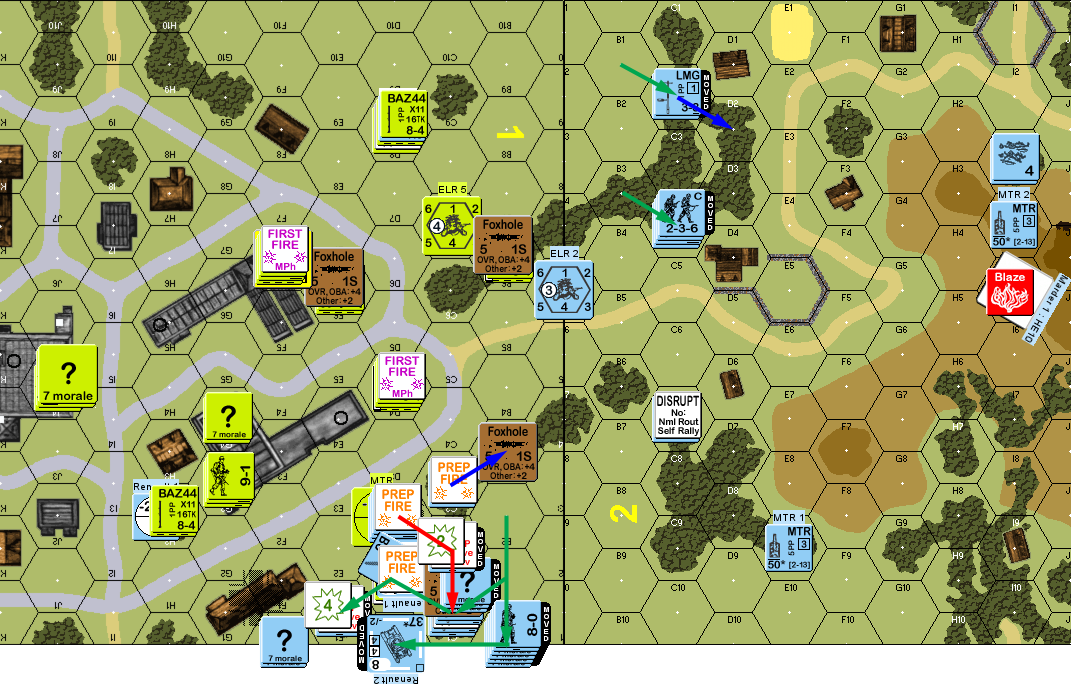
Mark led off with a bombardment of forward positions from all his ordnance, including a nice rate-tear from one of the MTRs. However, the only result was to reveal my squad in 1B6 and battle harden him. Movement was fairly calm until a 8-0 came into view, and the high-up MMG pinned him and ELRed the conscripts with him (for the first turn or so, I was stuck on the underscored morale method of breaking into HS for anyone who couldn’t be Replaced, before finally remembering they should be disrupting instead). Then an 8-1 came in next to that, and the MMG broke him and the MMG squad with him. In DFPh, the MMG claimed another victim, breaking his 9-1 and LMG squad, and the ATG took what I supposed to be a ranging shot at the hull down Marder, which hit and burned it.

Situation, German Turn 1, showing the full board. North is to the left.
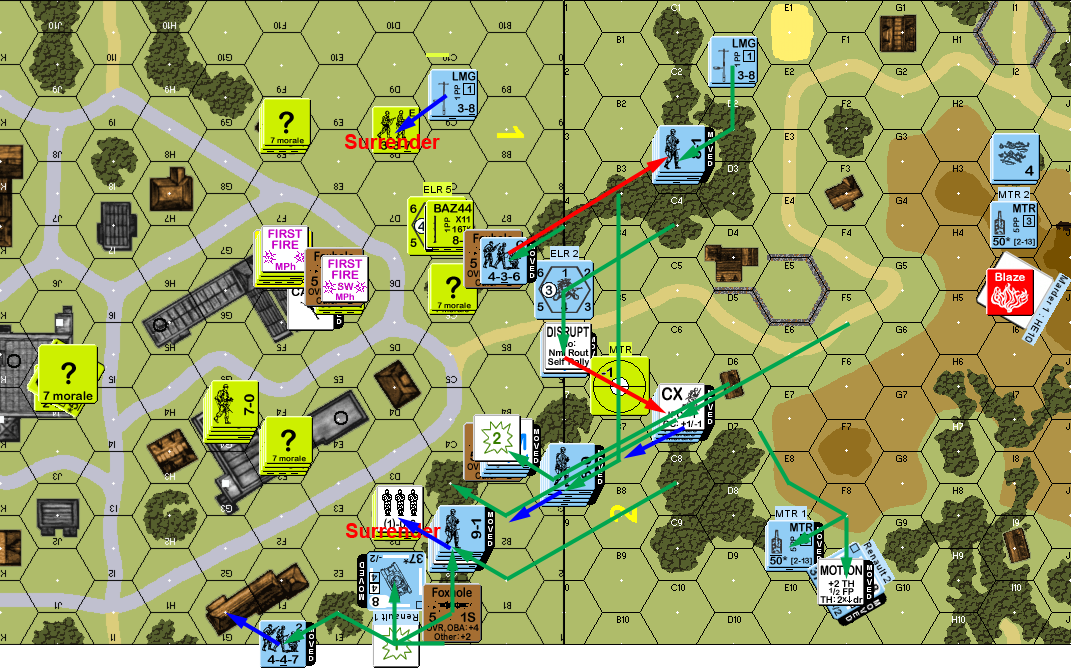
Mark managed to self-rally his 8-1 on my turn, but lost a HS to a 12. Prep fire from the revealed fanatic squad and the MMG broke a squad and ELRed one of the MTR squads. My only move was to skulk 1D4 out of LOS and Mark’s fire revealed and broke the HS in D8 and the BAZ squad in C1. The latter was annoying, since they routed to D2 where I revealed my HIP 7-0 to attempt rally on Mark’s turn. I advanced a squad into F8 and pulled the fanatics back to the C7 building.
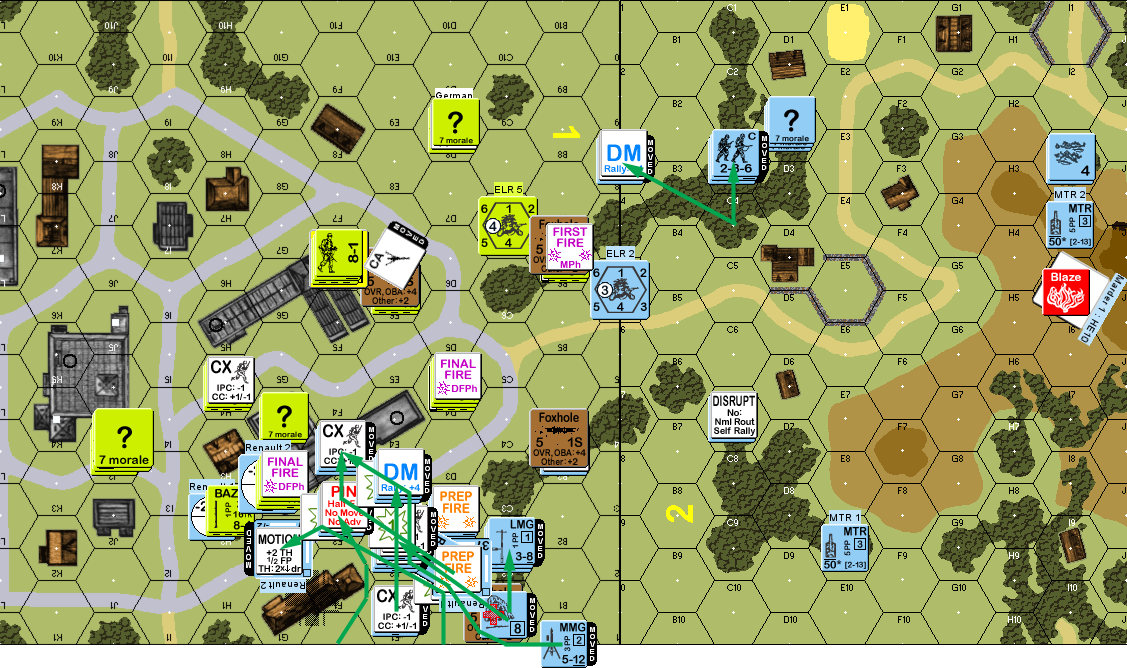
Mark got his 8-0 and two squads back for his turn 2, but his only prep fire shot was ineffective. His first move walked a squad up to the foxhole in 1B3, and the HS there fired to break them. After that, there was little to keep him out of that pocket, and the next squad got to C1, where the D2 squad revealed itself and broke them. His third attempt took the MMG and then a SFF shot, but survived both.
On the other flank, he moved up, and I left a wall of residual at the board edge, pinning a squad, breaking one, and getting a K/1 (with broken HS) on another, though one squad got through to the C9 woods. His advancing fire broke the 7-0 in D2 and CRed the MMG squad on a 12, but the broken squad there was unaffected. The Germans were at 11 unbroken squads.
Situation, German Turn 2.
I self-rallied the HS in 1F8 for my turn, and Mark rallied the squad in C1. Despite being in woods, the MTR was unable to affect the squad in C9, and the rest of my prep did nothing. My moves were minimal again, with D4 pulling back, B3 sliding towards the D2 building, and the recovered F8 HS crawling towards the D8 building. Mark’s fire was thankfully ineffective, and I occupied the last two buildings mentioned while the first squad advanced into F3 to cover the flank.
Mark self-rallied his squad in 1C7 and rallied a HS in 2D2, while my two squads refused to rally. He rushed a couple squads adjacent to 1D2, where my HS was too busy guarding a squad of prisoners to respond, but the MMG in F6h2 eliminated a squad with a 1KIA. A later move broke a squad to the MMG. He also started shifting what he could down to that flank, with one squad disrupting to MTR fire in the open, while a three-squad stack (with 8-0) got through unharmed.
Final fire broke another squad, and advancing fire broke my HSes in D2 and D8, which both surrendered (rearming some of the German prisoners). At the end of the turn, he was, again, at 11 unbroken squad equivalents, and had captured three buildings.
Situation, German Turn 3.
I rallied my squad and a half in 1G4 rallied. Mark didn’t manage to rally anything, but his remaining unarmed HS recovered my abandoned BAZ in D2. The MTR got several hits, ending with a CH on D8 that broke Mark’s squad. The associated squad then broke a 8-0, and the MMG ELRed a squad in C2 (while leaving the American prisoners unharmed).
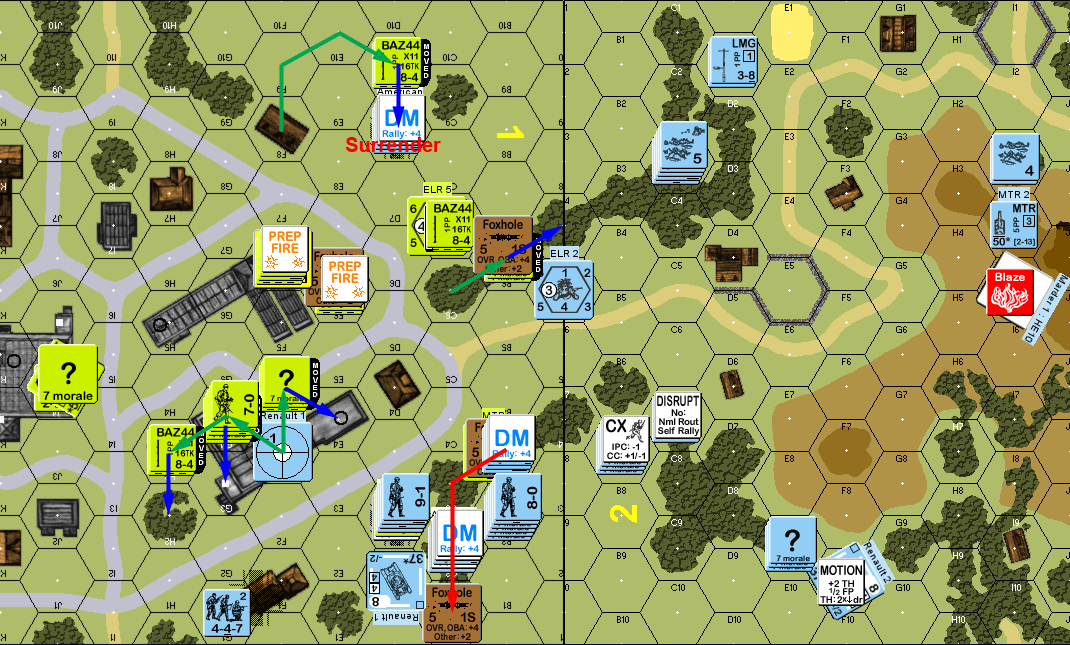
Situation, American Turn 3.
Mark self-rallied a HS in 2D1, and rallied a squad in C3 for his turn 4, while I handed my new prisoners off to the rearmed HS in 1D8. He prepped at 1G3, but did nothing other than forcing a reveal on my 9-1. He tried advancing up the middle, but ran into a K/2 from the MMG again, which reduced a conscript squad, and broke them and his 8-1, leaving a MMG squad to continue (a DFPh shot wounded the leader and finished off the HS). That last squad went into CC with the “?” in 1A7, to find they were Dummies. At this point, he had 10.5 unbroken squads, but was down to two buildings.
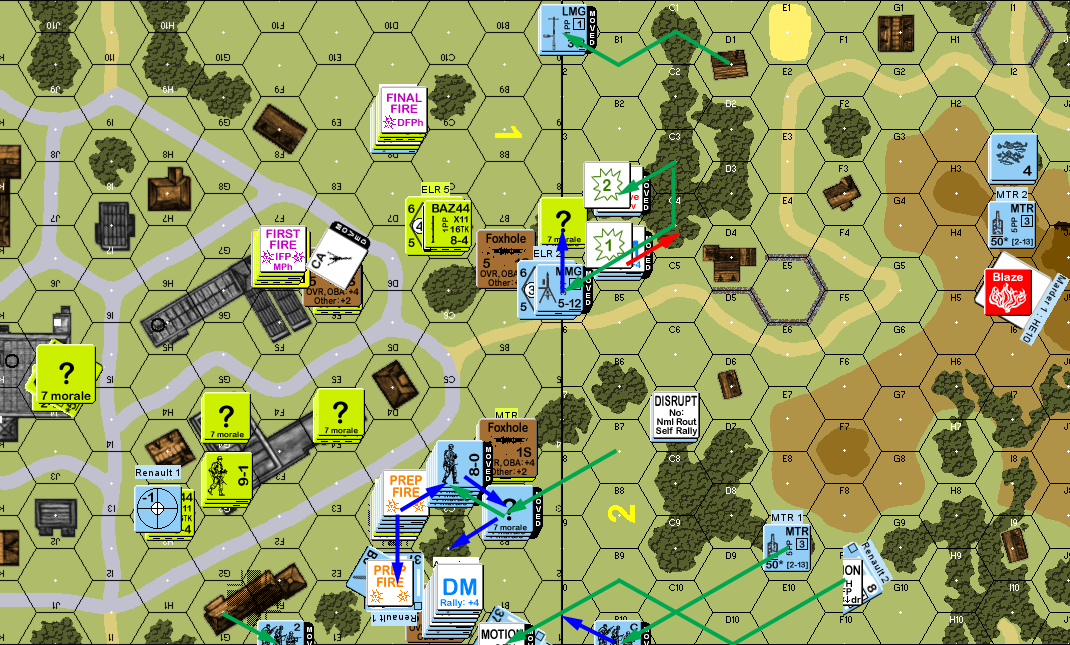
Situation, German Turn 4.
I recovered a German LMG for my turn 4 RPh, while Mark rallied a 8-0 and two squads in 1C1. The LMG helped to break his MMG squad in A7, and then malfed on its second shot. With everything shifted over to the west, the ATG changed CA to cover the I hexcolumn. I skulked a couple guys back out of LOS, and Mark got a good DFPh shot at E4, but they went fanatic and generated a hero.
Mark rallied his wounded 8-1 for his turn 5, and prepped a couple squads, the captured BAZ and the in-position tank to no better effect than a passed TC. In the east he pulled back, while shifting forward in the west. My MTR got another CH on 1D2 to wound and ELR his 9-1 and pin the HMG squad. To make up for that, the MMG in G3 malfunctioned. He was at 11 unbroken squads and two buildings.
Situation, German Turn 5.
Mark rallied a squad for my turn 5 RPh, and my MTR malfunctioned in prep after a few more ineffectual hits, while the MMG broke the squad in C2. I skulked again, and the squad in D8 went west to join the defense against the west push. He got a range 7 shot at them from his MMG in 2C4, which malfunctioned. I pushed the ATG out into the street in J3 to get a better LOS into the area.
Mark repaired his MMG for his turn 6 rally, but nothing else happened. A Renault got a hit for a 2MC on H2, which thankfully passed. The last turn rush went about as expected. The first squad into the open (E2) got pinned, the second went through the residual and took a 3KIA in E3, the third took a K/1 in F2 and got into the G3 building, the fourth and fifth pinned to residual, the sixth (and 8-0) broke to residual, the seventh made it through.
The game ended at the start of my DFPh when the BAZ squad in H2 got K/1 on the pinned squad in F2. Just the CR put him down to 8.5 unbroken squad equivalents.
Situation, German Turn 6.
Afterword
To start with, I had some good dice throughout the scenario. Turn 1 especially saw some good luck, with some important breaks and the loss of the Marder I. I’d also like to say that 1J4 is a fairly good location for the ATG as it has a surprising amount of LOS down the center from there. If you want to cover one of the flanks with it, J0 or F8/G9 are probably better, but also more exposed.
Mark’s plan was in the general lines of push everywhere, and see what gives first. That can be a good idea, especially if you can switch from one axis of advance to another in a hurry, but those Renaults are too slow for that. And when he did get somewhere, he didn’t really push on it. If the squad in G1 had made it further north (breaking in the attempt was a real possibility), he could run around playing “tag” with buildings and win by himself. With a bit of cover….
Usually, a MG in a high position gets into trouble fairly soon, and targeting it with one of the Renaults may have been the best answer. 8 +2 TH (Stone, BU, -2 Acq) isn’t the best, but the 4FP +0 shots would get them sooner or later. Or, if the Marder was available, have it get into a duel with it, and switch to Smoke at an appropriate time.
I basically played “zone defense” with the east, west, and center as different zones, and two important units (MMG and MTR) placed to support any of them, and that worked out well. Mark’s biggest problem was hitting a well-constructed defense, supported with some good dice, and with a solid means of taking it apart (tough with these troops).
Also, I’ll admit I’m not sure what to do with the German MTRs. The hill is too vulnerable, as there’s no cover on it, and outside the crest hexes, HA can be negated by the upper levels of buildings. Also, most of the Americans should be in buildings, and the 50mm MTRs can’t do much there.
Discussion ¬